On a wedding day I rarely shoot with a single camera. On this one I had a Sony A1, a Sony A7 IV and a Nikon ZR shooting RED RAW with an anamorphic lens, all rolling at the same table. Three sensors, two different Log curves, two colour gamuts. In the edit they have to look like one film. This is how I color match multiple cameras in DaVinci Resolve without spending hours on every shot: one Colour Space Transform into a common space, then one LUT for the look.
The cameras and lenses
- Sony A1 + Sony FE 50mm F1.2 GM: S-Log3 / S-Gamut3.Cine, H.265 10-bit 4:2:2, UHD 50p
- Sony A7 IV + Sigma 17-40mm F1.8 DC Art: S-Log3 / S-Gamut3.Cine, H.265 10-bit 4:2:2, UHD 50p
- Nikon ZR + Blazar 50mm T2.1 anamorphic: RED RAW (R3D NE), Log3G10 / REDWideGamutRGB, 25p
- Post: DaVinci Resolve Studio 21, UHD 25p timeline
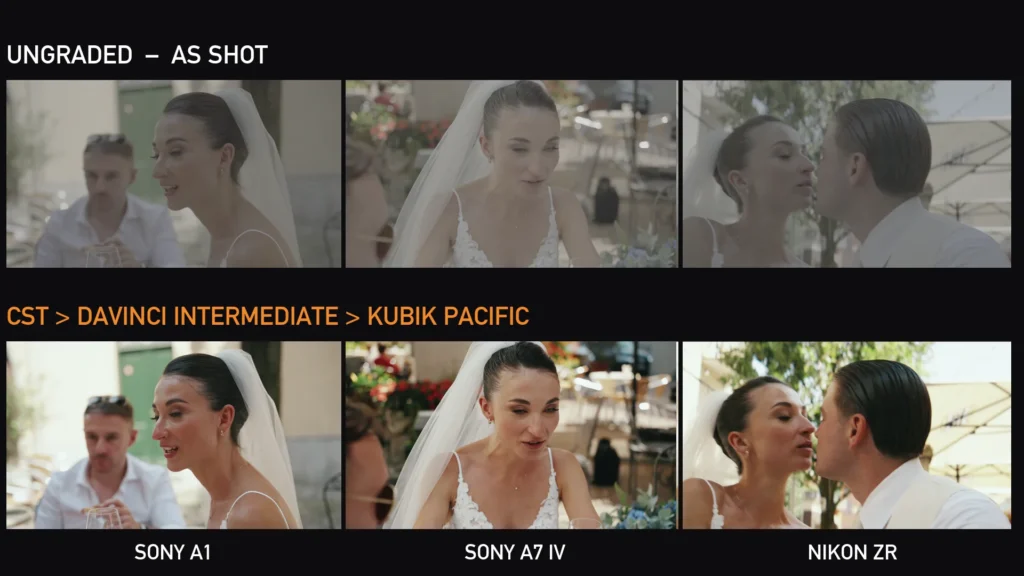
Look at the ungraded clips and you can see the problem straight away. The two Sonys share a Log curve, but they are different sensors with different lenses. The Nikon is a different world: RED’s Log3G10 and its own wide gamut, plus the flares and oval bokeh of an anamorphic lens. Grade each one by eye and you will be chasing skin tones all day.
The trick: convert everything into one common space
The idea is simple. Before any look goes on, every camera is converted into the same working space. I use a Color Space Transform (CST) node and set the input per camera:
- Both Sonys: S-Gamut3.Cine / S-Log3 → DaVinci Wide Gamut / DaVinci Intermediate
- Nikon ZR: REDWideGamutRGB / Log3G10 → DaVinci Wide Gamut / DaVinci Intermediate
After the CST the three images still look flat, but now they are flat in the same way. They share one gamut and one transfer function, so whatever comes next sees comparable data from every camera.
One LUT for the look: KUBIK PACIFIC by KOLOR
For the look I use the KUBIK LUTs from KOLOR, the colour company of Eric Lenz. KUBIK is built for Final Cut Pro and DaVinci Resolve, and the Resolve version comes with LUTs designed for exactly this input: DaVinci Intermediate / DaVinci Wide Gamut to Rec.709. That is why the CST step matters. Feed the LUT the space it was built for and it behaves the same on every camera.
My favourite of the looks is PACIFIC. KOLOR describes it as inspired by classic Japanese film stocks, with soft skin tones and medium contrast, which is exactly what I want for weddings. There is a free version and a premium one with higher-resolution 65-point cubes. You can find all the details on the KUBIK page on the KOLOR website. I wrote more about how I met KOLOR and Eric’s approach in my earlier article on the KOLOR colour workflow.
My 7-node tree
Every clip in this video gets the same node tree. The only thing that changes from camera to camera is the input of the CST.
- Noise Red: light noise reduction before anything stretches the image
- Exposure
- WB: white balance
- CST: camera Log → DaVinci Wide Gamut / Intermediate
- Contrast: a gentle custom curve
- Grading & Skin
- LUT: KUBIK PACIFIC, DaVinci Intermediate → Rec.709
Save it as a PowerGrade, apply it to every clip, swap the CST input for each camera and you are 90% of the way there before you touch a wheel.
Before and after, camera by camera
Sony A1 + FE 50mm F1.2 GM
Out of the camera the S-Log3 is flat and milky, as it should be. After the CST and PACIFIC, skin goes warm and soft and the green door in the background stays natural rather than neon.
Sony A7 IV + Sigma 17-40mm F1.8
Same Log curve as the A1, different sensor and glass. With the same tree and the same CST input it lands right next to the A1: same warm skin, same soft contrast, and the flowers in the background keep their colour without shouting.
Nikon ZR RED RAW + Blazar 50mm T2.1 anamorphic
The odd one out on paper, and the most interesting result. Once the R3D is converted from Log3G10 into DaVinci Intermediate, PACIFIC gives it the same palette as the Sonys. The anamorphic character stays (the wide frame, the flares, the oval bokeh) but the colour sits in the same film.
What the LUT does, and what you still do
- Set the CST input right. S-Log3 / S-Gamut3.Cine for the Sonys, Log3G10 / REDWideGamutRGB for the Nikon RAW. A wrong input is the most common reason a LUT “doesn’t work” on one camera.
- One output space for all. DaVinci Wide Gamut / Intermediate is what the KUBIK Resolve LUTs expect.
- Balance before the LUT. Exposure and white balance still need a quick pass per clip. The LUT unifies the look, it doesn’t fix mistakes.
- Same tree, every clip. Keep it as a PowerGrade so every camera goes through exactly the same steps.
Why I left the action camera out
I also had a few clips from a small action camera on this wedding. It didn’t sit well next to the others in Resolve, so I left it out of this comparison. When a camera fights you that much, sometimes the best match is not to use the shot.
Watch the full video
The video shows each camera ungraded, the CST step, the node tree and a before/after wipe on every camera, then all three side by side: watch it on YouTube. A 30-second version is on Instagram and YouTube Shorts.
Shot on Sony A1 with the FE 50mm F1.2 GM, Sony A7 IV with the Sigma 17-40mm F1.8 DC Art and Nikon ZR in RED RAW with the Blazar 50mm T2.1 anamorphic. Graded in DaVinci Resolve Studio with the KUBIK PACIFIC LUT by KOLOR. Edit and grade by Alex Sofo.
[…] A stable white balance in camera also makes the grade much easier, especially when you mix cameras. I wrote about that in Three Cameras, One Look: Matching Sony and Nikon RAW in DaVinci Resolve. […]